
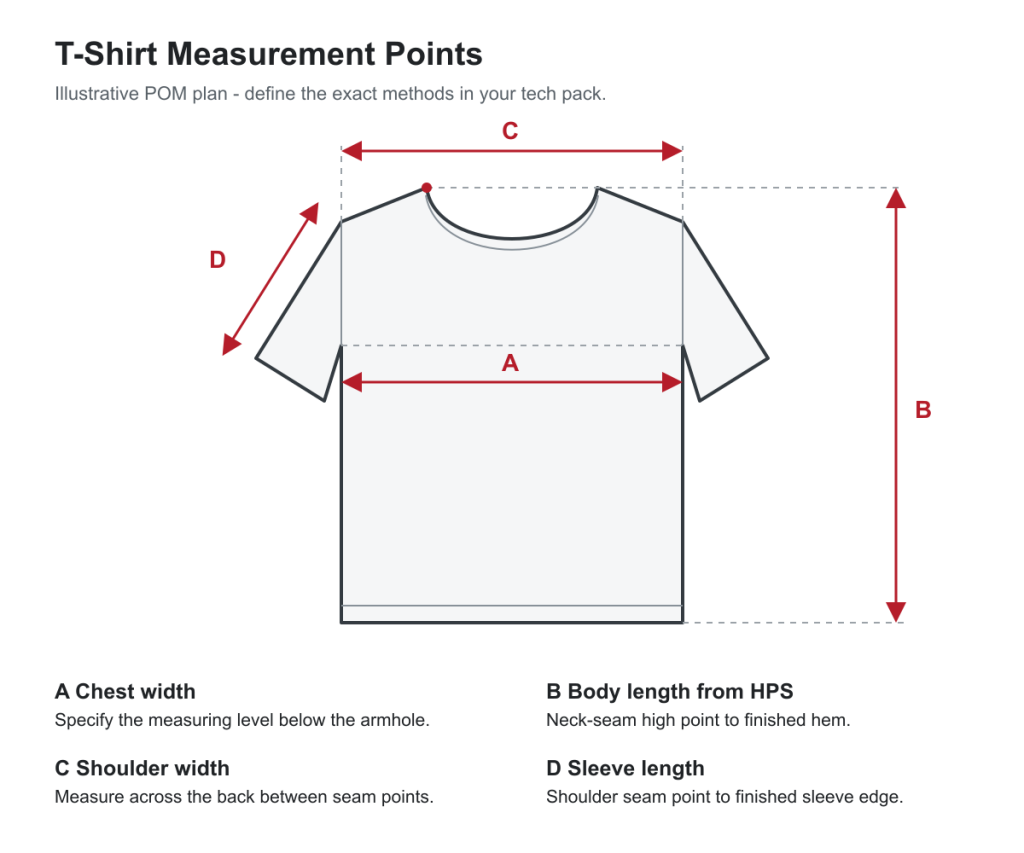
To measure a T-shirt for manufacturing, lay the finished garment flat without stretching it, use agreed reference points, and record every result against a dated specification. Chest width, body length, shoulder width and sleeve length are useful starting points, but a production-ready chart also needs measurement methods, units, tolerances and the garment’s wash condition.
This guide is for clothing brands developing a fit or approving samples. It is not a body-sizing chart: the dimensions of a finished T-shirt and the measurements of the person wearing it are different.
Download the blank T-shirt measurement worksheet (CSV) to record your style’s targets, sample readings and approval comments. Agree the values and methods for the actual garment; the worksheet is not a ready-made size chart.
Developing a new style? Send Eking your reference garment, size chart and planned order quantity so the production requirements can be reviewed together.
Start with the garment, not the size label
A size M label does not define a universal fit. A cropped boxy T-shirt and a long, relaxed T-shirt can share a size label while having different proportions. Record the shape you want in measurable terms instead of asking the factory to make it “oversized.”
Separate these three documents:
- Body size chart: the intended wearer’s body measurements.
- Garment specification: the finished product’s measurements and tolerances.
- Size breakdown: the number of pieces ordered in each size.
A flat chest width is not a body chest circumference. Doubling it gives an approximate garment circumference, not the wearer’s chest size or the intended wearing ease.
Prepare the sample before taking measurements
- Identify the style, labeled size, sample revision and fabric.
- Record whether it is unwashed, garment-washed or tested using a specified care procedure.
- Let the garment lie naturally on a flat surface. Smooth wrinkles without pulling the knit.
- Align the front and back panels without forcing seams into a different position.
- Use a flexible measuring tape that has not become stretched, and keep it straight between the agreed points.
- Measure in one unit system. If a second unit is shown, state the conversion and rounding rule.
If the factory uses a defined conditioning or relaxation procedure, record it in the tech pack. Two readings are not directly comparable when one sample has just come off a press and the other has been washed and rested.
Define each point of measurement
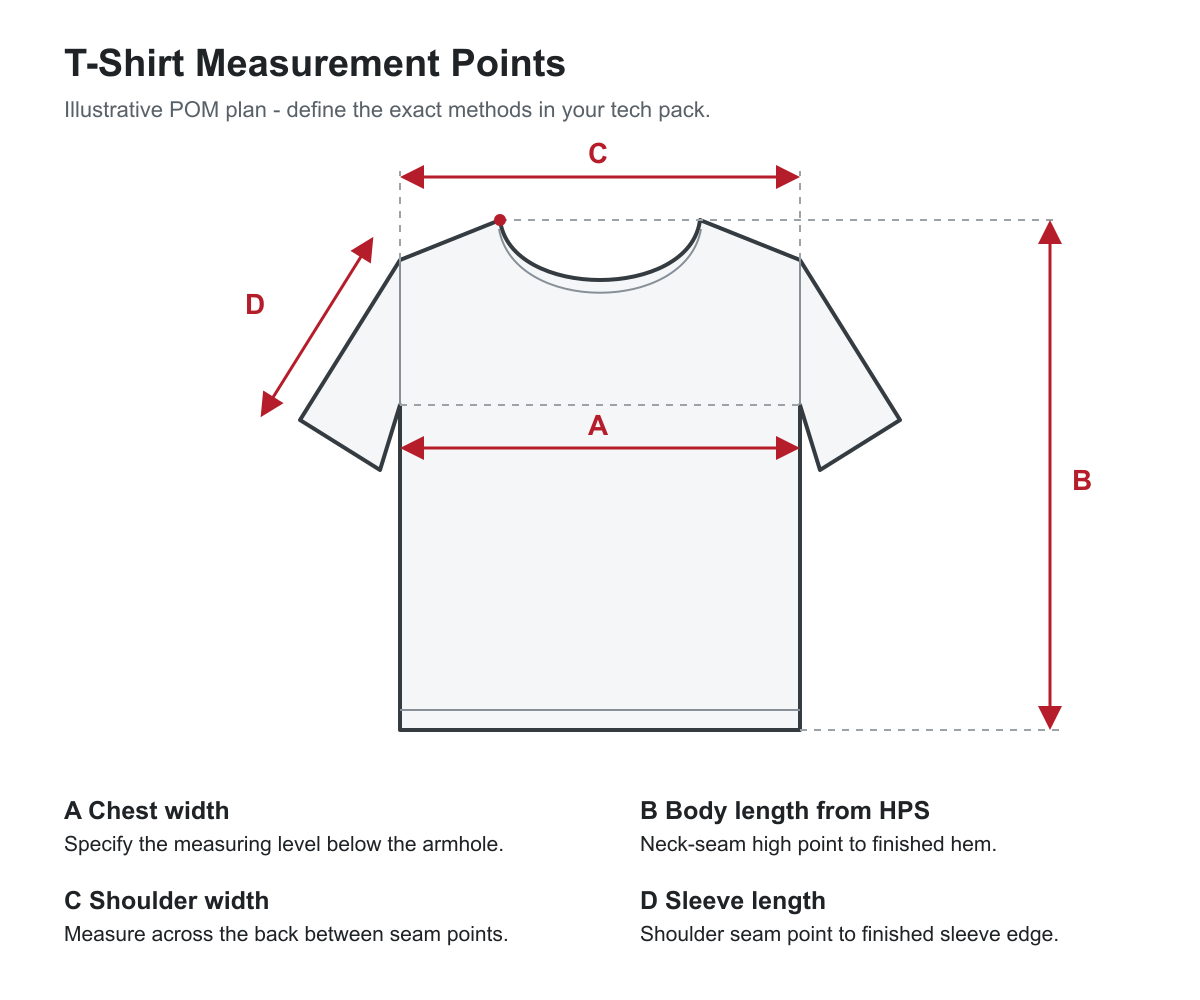
A point of measurement, or POM, identifies what is being measured and how. Add a marked diagram or reference photo for any method that could be interpreted in more than one way.
| Measurement | Method to specify | Common ambiguity |
|---|---|---|
| Chest width | Measure straight across the body at the agreed level below the armhole. | State the exact offset; do not switch between the underarm junction and a lower level. |
| Body length | For an HPS method, measure from the high shoulder point where the neck seam meets the shoulder seam to the finished hem. | Specify front or back and whether the neck rib is excluded. |
| Shoulder width | With the back facing up, measure straight between the agreed shoulder-to-sleeve seam points. | Do not substitute a curved seam measurement. |
| Sleeve length | Measure from the shoulder-to-sleeve seam point along the agreed upper sleeve line to the finished sleeve edge. | Center-back sleeve length uses a different starting point. |
| Sleeve opening | Measure the opening flat, edge to edge, without stretching. | Clarify half-width versus full circumference. |
| Bottom opening | Measure the finished lower opening flat at the defined hem position. | Split hems or curved hems need their own diagram. |
| Neck opening and rib | Define seam points for neck width and the position used to measure finished rib width. | Outside-edge and seam-line readings are not interchangeable. |
These are proposed definitions, not a universal standard. For example, SanMar’s published product measurement instructions distinguish high-point-shoulder body length, a specified chest offset and center-back sleeve length. A factory brief should be equally explicit, even when it uses a different method.
Adjust the measurement plan for boxy and drop-shoulder fits
For a drop-shoulder T-shirt, the sleeve seam sits farther down the arm than it does on a conventional set-in fit. Changing shoulder width changes where the sleeve begins, so sleeve length alone does not describe the final silhouette.
Review chest width, shoulder width, body length and sleeve length as a group. Add a worn fit reference to explain the intended shape, but use the specification to define the product. A photo cannot replace measurable dimensions. Keep the garment specification separate from decoration measurements: the T-shirt print placement guide covers graphic width, height and position.
For raglan sleeves, curved hems or asymmetric designs, use a style-specific POM plan rather than forcing the garment into a standard set-in-sleeve chart.
Use tolerances without turning them into fit allowances
A tolerance is an agreed acceptance range around a target measurement. It is not permission to redesign the fit, and it is not the same as shrinkage allowance or the difference between sizes.
Illustrative example only: if a chest-width target is 58 cm with an agreed tolerance of plus or minus 1 cm, the range is 57-59 cm. That does not mean every POM should use a 1 cm tolerance, or that a 58 cm chest is suitable for every size M. Set tolerances with the manufacturer for the actual style and fabric.
Record both the target and the sample reading. Do not replace the target with the latest sample result unless that change has been intentionally approved.
Keep a measurement and approval record
For each POM, record the code, definition, target, tolerance, sample result, difference and decision. Keep the sample ID and revision date attached to the chart.
Download the blank T-shirt measurement worksheet (CSV). It includes POM definitions and fields for targets, tolerances, sample readings and approval comments. Fill in the agreed values for your style; the sheet does not prescribe a universal size chart.
Before approving bulk production, check that:
- The chart and the physical sample refer to the same revision.
- Measurements use the agreed wash condition and methods.
- Changes to one dimension have been reviewed for their effect on the overall fit.
- Size grading has been reviewed separately from base-size approval.
- Outstanding fit or measurement issues have a clear correction and approval record.
Use the same approach in your clothing tech pack and garment measurement tolerance plan. A consistent method is more useful than a chart containing many unexplained numbers.
T-Shirt Measurement FAQs
Do I include the collar when measuring T-shirt length?
Not when your approved method starts at the high shoulder point on the neck seam and excludes the rib. Other length methods exist, so name the method and mark its starting point rather than assuming everyone measures the same way.
Can I use a retail T-shirt as a fit reference?
Yes, as a starting reference. Identify its wash condition and any fit changes you want. Convert those decisions into your own finished-garment specification; the retail size label alone is not enough.
Should I measure before or after washing?
Record the condition relevant to each approval stage. If the finished style includes garment washing, approve the intended finished condition. For care testing, record the procedure and keep the before-and-after results separate.
Is one approved size enough for the full size range?
A base-size approval does not establish every other size. Review the grade rules and agree which size-set samples or measurement checks are needed before production.
Turn your reference T-shirt into a production brief
For a custom T-shirt manufacturing inquiry, send the reference garment or photos, intended fit, base size, measurement chart, fabric preferences, decoration details and quantity by size. Flag any dimensions you want to change instead of leaving the factory to infer them.

